
Gymnastics for quick weight loss at home: a set of effective exercises. Gymnastics for beginners at home
Gymnastics is a special sport. With its help you can make your figure slim, it disciplines you, but there are quite a lot of difficult exercises, you need to get used to this sport gradually. You need to decide what type of gymnastics you will do in the future - sports, artistic, athletic, recreational, or just do exercises to keep your body in shape.
Start of classes
It is best to practice at a sports school or sports club under the supervision of a coach or instructor. This saves a lot of effort on finding training methods. But the simplest gymnastic exercises can be done at home. If you need good results in the future, it is advisable to start training from childhood, sports schools They are accepted into gymnasts from the age of four to five. The sooner you start, the easier it will be to master difficult exercises. 
But simpler ones gymnastics complexes It can be done at any age. You just need to find a free half an hour several times a week, preferably three times, and study every other day. If you exercise less often, there will be no result, as muscle tone and stretching will disappear. Buy an exercise mat and clothes that won't restrict your movement. 
To get a good result, you need to follow an easy diet, especially since gymnastics is good for losing weight. To successfully burn fat, you need to run or jump rope for ten minutes before class. Exercises in classes should be done in such a way as to load problem areas. Before training, you can eat protein foods (cottage cheese, eggs, chicken), while doing exercises you can drink clean water, and after exercising it is better to wait at least two hours before eating.
Basic rules of classes:

Exercises to get started
 The following exercises are for complete beginners who have no physical training at all. In the next complex, you can lean on something, for example, on a chair, table or headboard, or on a door or wall. When the muscles get stronger, you can abandon the support. The goal of the following exercises is to warm up well and feel the pleasure of physical activity.
- Place one leg forward and lunge first on one leg, then on the other. The angle of the leg should be obtuse, maximum straight. The back leg can be bent at the knee, even touching the floor. You can spread your legs wide apart, it’s easier. Over time, you can pick up dumbbells. The hips and buttocks are trained.

- The inner thighs and buttocks can be trained with side squats. You need to spread your legs wide, toes straight and transfer your body weight to one leg until you feel tension in the muscles.

- Place your hands on the back of the chair, stand on your toes, keep your torso and back straight, place one leg in front and make circles with it, as if in ballet. These movements strengthen your feet and strengthen your hips.

- To shape your waist and abdomen, bend over and place straight legs Bend over shoulder width, reaching your hand to your knee. The core muscles should stretch and tighten.

- Push-ups train pectoral muscles, as well as the stomach, shoulders and back. But the result will be if you keep your back straight and do push-ups, touching your chest to the floor. To learn how to do push-ups correctly, first do push-ups from the back of a chair, then from the bed, and then from the floor. Push-ups put a lot of stress on the heart, so you need to do the exercise carefully and without unnecessary stress.

- Exercise with a gymnastic stick. Take the stick in both hands, place it in front of you, your hands should be wider than your shoulders. And with effort, bring the stick closer to your chest and move this gymnastic apparatus away, touching the top and bottom of your chest alternately.
Simple tricks
Warm up your body with exercises that you like - run, squat, jump from bent knees. It is important to do movements that accelerate blood circulation, which means prepare the heart for stronger loads, so-called cardio exercises. Then proceed to the simplest tricks, which can already be considered gymnastic.

You've probably had the opportunity to watch gymnasts perform on TV more than once, how they masterfully perform the most complex technical elements. All this is many years of training. And where did it all begin?
Mothers bring little tiny creatures to rhythmic gymnastics at 4-5 years old. The first year is one of the decisive stages: girls learn the basics of gymnastics - the basic basic elements, they are stretched, they do a lot of flexibility exercises, they pump up the muscles of their legs, abs, back, arms, and learn to pull their toes and knees. And most importantly, girls begin to feel (control) their bodies. In this article we will look at the main (basic) elements with which rhythmic gymnastics begins.
I. Twine.
There are several types of twines: right, left, transverse and vertical. The vertical one is a more complex element and here, in addition to stretching, you also need to be able to maintain balance on one leg. Stretching is very important for a future gymnast. Therefore, the element needs to be given a lot of attention, especially to the correct execution. Before doing stretching or flexibility elements, you must first “warm up” the child. Jump a little, run with him, do squats, squat (like ducks) so that the child’s muscles are elastic and easier to stretch. Remember - never pull on an unheated (“cold”) child; in addition to pain, you can also damage the baby’s ligaments. Do not do anything abruptly, only with smooth movements and springing several times.
There are several ways to stretch for splits:
1. Place the child on your knees with his back to you. He wraps his arms around your legs. Next, the baby lifts one leg, you take it with your hands (you can take it under the knee, you can take it by the foot) and pull it towards you. Be sure to ensure that the “pelvic bones” are on the same line (not skewed). Do 15-20 springs for each leg (look, of course, at the child - you can do 5 springs and repeat after 5 minutes). Don't forget to stretch both legs, otherwise the baby will be stretched one-sidedly.

2. If you have a wall bars, then the child throws one leg onto the wall bars (the higher, the better), and you slowly press the supporting leg against the wall bars (spring), in no case sharply. We do this exercise on the right and left legs, as well as place the child sideways against the wall bars and raise the leg to the side (cross-split stretch). This is preparation for the vertical split, the child learns to balance on one leg.


3. Sitting on your butt with your legs apart, two arms raised up, the back flat, we bend one by one to the right leg, to the left leg (we reach for the heels with our hands) and lie down in front on our tummy, with our arms in front of us. This exercise is good to do together with mom (dad) - sit opposite each other and bend over. Then in the same position we do circular movements from right leg to left (tummy as close to the floor as possible).
4. Sitting on the floor, we make a lotus, with our hands we press our knees to the floor (you can use springs, or you can slowly direct your knees to the floor). Ideally, when your knees are on the floor, then you can move on to more complex exercises.

5. We do an exercise similar to the lotus, only the child lies on his stomach, and the legs at the back are bent at the knees, the “toad” or “lotus on the stomach” position. You need to try to press the child’s butt to the floor.

6. The child lies on his back, two legs up (the legs are straight, extended, the back lies flat) - and you begin to slowly spread the legs to the sides, make small spring movements, trying to bring the legs closer to the floor. Ideal when the legs reach the floor.
7. Place a children’s high chair or stool in front of the child (something low - see 50-60 in height, you can use a sofa) and put one leg on the chair, and the second leg moves apart into a split. And slowly spring your butt towards the floor. Try to keep your child's hips and shoulders in line. This exercise is suitable for stretching the right, left and cross splits.
Properly executed twine:
Right or left split: the child sits on the split, shoulders and hips are in line, the back is straight, knees and toes are stretched;
- cross split: stand on the side and see if the legs are on the same line, the knees and toes are tense, then the child is sitting correctly. If there is no line (i.e. a corner instead of a line), then it is not a split, but legs apart)).
If you want to achieve results in stretching, then it is advisable to do the exercises daily, then the muscles will become more elastic. And of course, the sooner you start studying, the better.
Another important element for twine is the fold.
II. Fold.
A fold is when a child sits on his butt, his legs are together in front of him, and his tummy lies completely on his legs, his hands clasped his heels, his knees are stretched like “strings.”

Exercises to help prepare for the fold:
1. The child sits on his butt - his legs lie together in front of him on a small chair and we bend forward (put the tummy on the legs) trying to grab the heels.
2. The child sits on his butt, legs in front of him - we do exercises with both feet together: towards ourselves - pull towards the floor (20-30 times), knees stretched. Then we fixed our feet towards ourselves and leaned towards the legs, trying to reach the feet and grab them.
3. Standing position: legs together, knees extended, bend forward - you need to put your palms completely on the floor, then try to hug your legs. This exercise can also be performed in motion: do small steps legs together with a forward bend and reach the floor with your hands (or place your palms on the floor), the tummy should lie on the walking leg.
4. We stand facing the wall bars - we throw one leg onto the wall bars at the level of the hips (hips and shoulders on the same line) - and bend towards the leg (to the right and to the left).
Your baby will be better able to do these exercises if you are an example for him! Do these exercises opposite each other and point out your baby’s mistakes. Be a positive example for him!
What the fold exercise does is stretch the hamstrings, which play a big role when stretching into splits.
III. Bridge.
Your little one has probably tried to stand on the bridge on his own more than once. Even when they are very small, they often bend over, making their first funny parodies of the bridge. How to make bridges correctly?
The correct bridge is when the fingers are as close as possible to the heels of the feet (touching is desirable), the feet are shoulder-width apart (a little wider is possible). The bridge turns out to be beautiful and high.

Exercises to develop flexibility and pump up the back muscles of a child:
1. While kneeling, we bend backwards and place our hands on the floor. We repeat the exercise 10 - 15 times.
2. Lying on your stomach, take your feet with your hands, bent at the knees, and make a “basket” or “rocker”. We pull our legs and arms up and “swing” like a swing. If a child can’t swing, help him a little.
3. The child lies on his tummy, legs together. You hold his legs a little near the feet. The baby tries to raise his back, arms either bent at the elbows behind his head, or extended in front, and when bending, press his arms to his ears. This exercise can be repeated until the baby gets tired (10 - 20 times), it not only improves flexibility, but also strengthens the back muscles. This exercise can also be done near the wall bars: lying on your stomach, with your back to the wall, secure your feet under the lowest bar and do the backbending exercise, and you can take a ball in your (outstretched) hands - this will make the exercise even more difficult.
4. The child lies on his tummy, legs together and bends back. First, you spring a little by the shoulders, tilt the back towards your legs, and then take his hands (while holding his legs so that they do not move apart) and pull them towards his legs (very carefully).
5. The child, lying on his tummy, tilts his back and bends his legs at the knees, his legs touching the baby’s head.
6. The child is in a standing position near the wall bars, at a distance of 50 - 60 cm from it. He places his hands on the wall bars and bends his back.
7. Positions - hanging on a wall bars (facing the wall), we tear our legs off the wall. Repeat the exercise 10 - 15 times. The more your legs come off the wall bars, the more your back muscles are involved in the work, the greater the effect.
8. Exercise “boat” - the child lies on his tummy and simultaneously raises his arms and legs. Repeat this exercise 10 - 15 times. This is a good exercise for pumping up your back muscles.
9. The child stands facing you, feet shoulder-width apart - you take him under the back, the baby tilts back - and you make springs - lowering and slightly raising his back. Do 5 - 10 springs and raise the back completely to a vertical position. Repeat this exercise 3 - 4 times, this is a kind of warm-up exercise for the back.
10. Very useful exercise for flexibility in early age- this is a cat. Standing on your knees on all fours (hands on the floor), bend your back downwards (your head reaches towards your butt) - “good cat”, then bend your back upwards (your head reaches towards your tummy, a kind of tubercle is formed) - “evil cat”. IN game form This exercise - the exercise goes well even with the smallest decks that can only crawl.
When the child’s back is already a little prepared, it’s time to start teaching him how to make a bridge “from the top,” i.e. bridge from a high position. First, it is better to lay something soft on the floor (so as not to hit your head), since the child’s arms are still weak and will creep to the sides, and of course, do this exercise at first only with mom (dad) nearby. Then you should take correct stance: feet shoulder-width apart, hands at the top near the ears, eyes raised up and looking at the tips of the fingers. Then hold the child under the back (it’s better for you to take a position on the side of the child and he will, as it were, lie on your hand), the baby little by little (slowly) begins to tilt back. When the deflection is so good (the eyes see the floor), then you can lower your hands to the floor. You can also hold the child by the swimsuit (T-shirt, blouse) while standing in front of him. Each time, reduce the degree of your participation in the process of standing on the bridge. When you are sure that the child will not fall on his head, try to have the child make the bridge on his own.
And one more very useful exercise that will help your baby learn to do a “bridge from above”:
- the child stands with his back to the wall (preferably a Swedish wall) at a short distance from it, makes a bend and begins to gradually move the handles to the very bottom of the wall and then, moving his hands to the floor itself (if it is a Swedish wall, then he intercepts the sticks alternately with the right and left hand).
Which are designed to improve motor skills, as well as overall health. Regular exercise helps develop muscle mass and improve performance respiratory system, increasing the flexibility of the musculoskeletal system, strengthening cardiac activity.
Gymnastic exercises amaze with their diversity and accessibility. They are suitable for people of all ages and fitness levels. Thanks to this, you can choose the optimal set of workouts for yourself and engage in such activity anywhere at a convenient time. Let's talk about what gymnastic exercises for children and adults exist.
Benefits and types of training
Regular activity will help you maintain excellent physical fitness. The main feature of gymnastic exercises is that they have an excellent tonic and training effect. Such exercises speed up metabolism, develop flexibility and mobility of joints, strengthen and increase the tone of muscle mass, without overloading the body. physical level.
Performing gymnastic exercises has a great effect on everyone’s work internal organs. As a result of exercise, the body's energy reserves are activated, blood circulation is stimulated, and the activity of the human respiratory and nervous systems develops and improves. Gymnastics will help you get a boost of energy in the morning, and evening time will relieve stress and psychological tension after a hard day.
According to the structure of motor activity, health-improving gymnastic exercises are:
- general developmental;
- tonic or rhythmic;
- athletic;
- medicinal.
When creating your own training set, choose those elements that will help you achieve your goal from playing sports. For example, regular general developmental gymnastics improves physical fitness and has a healing effect. You can increase muscle tone and endurance with the help of athletic elements. Rhythmic activity promotes weight loss, improves physical fitness and endurance, and gives an excellent boost of energy. Therapeutic gymnastic exercises will help correct posture and restore flexibility and mobility of joints. Let's talk about each type in more detail.
General developmental gymnastics
The largest and most popular group of exercises are general strengthening (basic) gymnastic elements. They are used to increase performance, improve and maintain physical fitness, and improve human health. As a result of regular training, blood circulation is activated, the respiratory system is stimulated, and the psycho-emotional background is stabilized. By doing this kind of gymnastics regularly, you will significantly strengthen your muscle mass, increase the tone of the whole body.

General developmental gymnastic exercises are performed without objects or using various sports equipment. There are many options for such training with a ball, jump rope, hoop, sticks, wall bars or bench. They are widely used as a warm-up before more intense physical activity. Performing general developmental exercises does not require special training or sports skills as opposed to other types of gymnastics, such as rhythmic or athletic. These elements have proven themselves to be the main means of maintaining the performance of older people.
A set of exercises without objects
General developmental gymnastics without the use of apparatus - convenient option workout. You do not need any sports equipment to complete this program. You can practice both at home and at fresh air. The entire load in these exercises comes from your own weight. It is recommended to perform the program at least 3-4 times a week, gradually increasing the load.

Let's consider a set of gymnastic exercises.
1.Strengthening arm muscles.
The workout is performed standing, feet shoulder-width apart, shoulders straightened, shoulder blades retracted, back straight. We do 5 variations of arm swings, 2-3 sets of 20 times: through the sides up, lifting in front of you, cross swings at chest level, wheel forward and backward. These exercises perfectly develop the shoulder girdle, increase joint flexibility, relieve tension from the upper back, and improve posture.
2.Training the muscles of the trunk.
Let's move on to exercises for the abdominal and back muscles - bending and turning the body from a standing position. Hands on the belt, feet shoulder-width apart, back straight. We perform 2-3 sets of 20 times: bending forward and backward, left and right, circular movements of the body. Breathing is even and calm.
Such gymnastic exercises for the spine strengthen the muscle corset, restoring flexibility and mobility of ligaments and joints. Remember to control your sensations during training. If any discomfort occurs in the spine, reduce the amplitude of rotation or reduce the number of repetitions, even stopping the exercise completely.
3.Strengthening leg muscles.
The final part of the complex is exercises for the muscles of the lower extremities. From a standing position, we perform 2-3 approaches 10-15 times: deep squats, raising the knees to the chest, swings and lunges forward with alternating legs. These exercises improve blood circulation in lower limbs, increase the tone of the muscles of the thighs and buttocks, and are an excellent prevention of venous insufficiency.
If you find it difficult to perform exercises in the specified volume at the initial stage, reduce the number of repetitions to an acceptable level. With regular training, you will quickly achieve these goals.
Exercises with a gymnastic stick
Training with a gymnastic stick helps to perfectly work out the shoulders, arms and back, and has a beneficial effect on strengthening the muscles of the core and lower body. Regular general developmental exercises with this apparatus allow you to restore the mobility of ligaments and joints, improve plasticity, and help relieve tension after sedentary work.

We offer you effective exercises with a gymnastic stick:
- Working out the shoulder girdle and legs. We hold the apparatus with a straight grip at chest level, feet shoulder-width apart, knees slightly bent, and keep our back straight. The exercise consists of 2 cycles: inhale - raise the stick up, exhale - place the projectile behind the head, lowering it as close as possible to the shoulder blades; inhale - the stick goes up, exhale - lower your arms to chest level, while squatting.
- Development of flexibility of hand joints. We hold the gymnastic stick in front of us at chest level. We make circular movements at maximum amplitude, first away from ourselves, then towards ourselves.
- Spinal twist. We fix the stick on the bend of the elbows behind the back, legs shoulder-width apart, feet pressed tightly to the floor. We make rotational movements with the body in different directions. During the exercise, try to keep your body strictly vertical, without lifting your feet from the floor, with your chin raised and chest straightened. Body movements are performed only by the muscles of the back and abdomen.
For training you will need a stick 120 cm long. We do each gymnastic exercise 2-3 approaches 20-30 times at a moderate pace. In the future, gradually increase the number of sets and repetitions. These simple but effective gymnastic elements are easy to perform at home. By doing just 10-20 minutes every day, you will quickly achieve flexibility and flexibility throughout your entire body.
Exercises with a gymnastic roller
The gymnastic roller is an effective sports equipment. Regular training perfectly works the muscles of the upper shoulder girdle, back muscles, abs, and legs. Simple at first glance, gymnastic elements give a colossal load on almost the entire body.

Consider exercises with a gymnastic roller:
- Stretching. We kneel down and hold the roller in front of us. As you exhale, we begin to roll the projectile forward until the chest touches the knees, and as we inhale, we return back.
- Abdominal and oblique abdominal muscle training. We stand on our knees, holding the roller in front of us. As you exhale, roll the projectile away from you, lowering your chest to the floor as much as possible, but without touching it. As we inhale, we come back. We make three movement options: straight, right, left.
- Working out the core muscles. We lie on our stomachs, arms with the roller are extended in front of us, toes resting on the floor. As you inhale, pull the roller towards you, bending at the lower back, and as you exhale, return to the starting point.
The number of approaches is determined based on the current physical form. If you are just starting to train, then perform 1-2 sets of 15-20 times. In the future, it is recommended to increase the intensity of the load to the maximum, increasing the number of repetitions and approaches. By devoting 20-30 minutes a day to such activities, you will significantly improve your physical fitness.
Exercises with a gymnastic bench
General developmental exercises using a bench train balance, sense of equilibrium, and improve coordination. This projectile can be used not only to develop the vestibular apparatus, but also to develop strength and endurance. By regularly performing various exercises on a gymnastic bench, you will quickly achieve good physical results.
Use this apparatus as a jumping bar, push-up support, or leg raise to work the major muscle groups in your body. Walking with different steps (side-step, cross-step, on toes) perfectly develops a sense of balance. If you play sports with a partner, then organize a small joint fight while standing on a gymnastics bench. This will help you not only diversify your workout, but also give a good load on all muscle groups.
General developmental gymnastics for children
Active outdoor activities strengthen respiratory and cardiovascular system baby, help increase immunity, harden children's body. Regular training will help your child develop well physically. When choosing types of activity from a wide arsenal of general developmental gymnastics for children, pay attention to the balance of the load.

- gymnastic exercises for the back, promoting the formation of correct posture;
- dance elements that help develop plasticity and a sense of rhythm;
- acrobatic exercises that improve flexibility;
- cardio training to increase endurance;
- game elements to develop concentration and focus.
A varied gymnastics program is the key to the full development of your baby on a physical and psychological level. If you have the opportunity, study with your child. Then you will show by your own example that physical education is an important part of life, which should be given maximum attention.
Rhythmic gymnastics for weight loss
Rhythmic gymnastics is a great way to improve physical fitness, get rid of extra pounds, activate the work of the whole organism. Regular exercise with energetic music combined with dietary nutrition will give you slim figure and a wonderful boost of energy. By doing gymnastic exercises for weight loss 3-4 times a week for 30-45 minutes, you will get rid of excess weight, increase muscle tone, improve body shape.

The training complex should include a warm-up, exercises for different groups muscles, stretching accompanied by musical accompaniment, which will set the desired pace of intensity. Any physical exercise with an aerobic effect, such as step or dance moves to energetic music, is suitable as a warm-up. The main part is gymnastic training for problem areas at a moderate pace: squats, walking in place, cycling, leg swings, raising the body, working with dumbbells. Stretches while listening to relaxing music.
Athletic gymnastics
Exercises using various weights are called athletic gymnastics. It perfectly develops physical parameters, trains strength and endurance, and forms a beautiful body silhouette. Weights, barbells with removable discs, rubber bands, expanders, block training complexes. Gymnastic exercises with weights are popular among both sports fans and professional athletes. Accessibility and a wide selection of training allow you to choose a program for any level of physical development.
Conclusion
It is recommended to do general developmental gymnastics not only at home or in gym, but also while walking in the fresh air. Regular exercise will help you maintain good physical shape, be toned and in a great mood. It is enough to devote half an hour a day to such training to achieve good results.
To make the whole day successful, you need to start the morning with something pleasant - for example, by smiling at your own reflection in the mirror. But what to do if the “picture” is not pleasing, the fat folds are visible to the naked eye, and there is no money, time or desire to go to the gym?
It would be an excellent solution light gymnastics for weight loss, which will not take much time, but will allow you to “tighten” your figure, make it slimmer and neater. What exercises are the most effective, how to perform them and what rules to remember when training? This will be discussed further.
What you need to know about such gymnastics
Trainers in different countries There is an active debate about which gymnastics is best for weight loss: some argue that you must train for at least an hour, others focus on cardio or strength training. However, the presented complex differs from popular programs in a number of ways advantages:
if you have chronic diseases joints, heart, diabetes, high degree obesity, consult your doctor before starting exercise. If you feel unwell, reduce the intensity of your workout or cancel it.
Please note that the complex should be performed regularly: in this case, the muscles will become more resilient, stronger, but not more prominent (without the effect of a “pumped up” body). Fat tissue will gradually “dissolve” (since energy is required to nourish muscles even at rest).
 To ensure maximum benefit from your classes, follow these simple steps: recommendations. First of all, adjust your diet: reduce the amount of fat, sweet or fried foods. Add more protein and greens to your diet. Drink at least two liters of water.
It is important to exercise every day, only on weekends you can make an indulgence. Choose the time for training depending on your schedule, but no earlier than forty minutes after a meal and no later than half an hour before it. Try not to overeat after training.
Start with the minimum number of repetitions and only then gradually add load.
Where to start gymnastics for weight loss
In order for the exercises to be beneficial and not cause injury, it is necessary to warm up the muscles before performing the exercises. To do this, do a warm-up. It takes three to five minutes, but allows you to prepare your muscles for intense work.
Exercise "Heron"
Keeping your posture straight, walk in one place. Raise your knees higher, and your arms, bent at the elbows, should move freely and actively. The gaze is directed forward. Take 60-100 steps.

"Wave"
Lie on your back, bend your knees. Place your hands on your stomach. Tighten your abdominal muscles (while pressing on them with your palms), then relax. Repeat 20-30 times.

Vigorous arm swings
Alternately: one hand goes forward, the other back, then spread your arms to the sides. At the same time, do not forget to maintain your posture. Repeat the swings 15-20 times on each hand.

Tilts
Stand straight, hands on your waist. Bend to the sides, then forward and backward: 15-20 times in each direction.

The best gymnastics for weight loss
Many people believe that morning exercises are most effective for losing weight, but you can perform the exercises at any time of the day. The main thing is to take a pause between training and meals, and also get muscular joy from every movement.
Gymnastics for losing weight on the stomach and sides
Exercise No. 1
Lie on the floor on your back, clasp your palms at the back of your head. Bend your legs at the knees, rest on the floor. Lift as you exhale top part torso, trying to reach the knees with your elbows. At the top point, fix the position for two to three seconds and slowly lower while inhaling. 30-45 times in 2-3 approaches.

Exercise No. 2
Sit on a bench or chair, hands on your belt or clasped at the back of your head. Turn to the sides, you can lean a little to the side. Repeat 30-50 times, 2-3 approaches.

Exercise No. 3
Lie on the floor, press your lumbar area against it. Bend your knees and your elbows, placing your palms behind your head. Inhaling, lift your pelvis, head, arms and shoulders. At the top point, freeze, as you exhale, slowly relax and lower yourself down. 30-45 times in 2-3 approaches.

Effective gymnastics for losing weight on legs
Lunges
Take a long step forward with each leg in turn, bending it at the knee and transferring your body weight to the front leg. Note that the thigh of this leg should be parallel to the floor. 30-60 times on each leg for 2-3 approaches.

Side lunges
Stand straight, keep your feet together. Alternately, take a wide step to the side, squatting and trying to reach the floor with your palms.

Plie
An exercise that will help tidy up your hips. Stand straight, bring your heels together, and turn your toes as wide as possible. Squat down slowly (knees pointing out to the sides), while maintaining a straight posture.

Gymnastics for losing weight buttocks at home
Squats
From a standing position, slowly lower your pelvis down until your thighs are parallel to the floor. After this, return to starting position. Repeat 40-80 times.

Gluteal Bridge
Lie on the floor, bend your knees, place your feet on the floor, and stretch your arms straight along your torso. Tightening your abdominal and buttock muscles, lift your pelvis until your stomach and legs form one straight line. Stay in this position for 5-10 seconds and slowly lower down. 15-30 times in 2-3 approaches.

Pull-up
Lie on your back, clasp one knee with your hands, pull it towards your chest. Stay in this position for half a minute. Perform 10-12 times on each leg (in 1-2 approaches).

Gymnastics for the back and arms
Reverse push-ups
To work your triceps, do reverse push-ups: rest your hands on a bench and your toes against a wall or other support. Slowly lower your torso by bending your arms. Repeat 20-40 times for 2-3 approaches.

Parallel Pulls
Get down on all fours. Slowly straighten one arm and the opposite leg, extending them to a straight line. At the top point, fix the position for one and a half minutes. Repeat ten times.

Jumping "Star"
Stand up straight, spread your arms to the sides. Jump by clapping overhead and spreading your legs wide. Repeat 30-60 times for 2-3 approaches.

So that such gymnastics is for fast weight loss brought your results, finish each lesson hitch. It is best to perform stretching exercises: slow bends forward with your palms touching the floor, static poses that stretch a specific muscle group. This will calm your muscles and restore your heart rate.
Gymnastics at home for weight loss - reviews
Lily:
“Great complex! I started with abdominal exercises and gradually added all the others. I feel slim, there is lightness in my body! And the scales show a plumb line of 4 kg per month.”
Inna:
“I have long been looking for gymnastics for the lazy that would be effective for losing weight. This complex perfectly toned muscles in just half an hour of daily training. In two months I lost 8 kg.”
Evgenia:
“A simple complex that can be performed at a time, or in the morning and evening. In seven weeks – minus six kilograms.”
“I’ve only been doing these exercises for two weeks, but I’ve already noticed how my abdominal muscles have strengthened and my thighs have tightened a little. And the scales showed a plumb line of 3 kg.”
Elena:
“Starting with such exercises in the morning, I literally recharge with energy for the day! The plumb lines are also pleasing - in three months 8 kg were “lost.”
Gymnastics for weight loss - video
If you want to add a few more exercises to the above list, pay attention to the complex presented in the video below. Doing it will make you proud flat stomach, slender hips and a toned figure. The trainer not only shows you the exercises themselves, but also tells you how to perform them correctly.
To have an impeccable figure, you don’t have to work your ass off in the gym: just regularly perform a simple set of exercises at home, and you can give your body the ideal shape.
Have you tried home exercises for weight loss? What exercises do you like best? What results have you achieved? Share your results in the comments!
(Told by master of sports in rhythmic gymnastics Yulia Sitnikova)
You've probably had the opportunity to watch gymnasts perform on TV more than once, how they masterfully perform the most complex technical elements. All this is many years of training. And where did it all begin? Mothers bring little creatures to rhythmic gymnastics at the age of 4-5 years. The first year is one of the decisive stages: girls learn the basics of gymnastics - the basic basic elements, they are stretched, they do a lot of flexibility exercises, they pump up the muscles of their legs, abs, back, arms, and learn to pull their toes and knees. And most importantly, girls begin to feel (control) their bodies. In this article we will look at the main (basic) elements with which rhythmic gymnastics begins.
I. Twine.
There are several types of twines: right, left, transverse and vertical. The vertical one is a more complex element and here, in addition to stretching, you also need to be able to maintain balance on one leg. Stretching is very important for a future gymnast. Therefore, the element needs to be given a lot of attention, especially to the correct execution. Before doing stretching or flexibility elements, you must first “warm up” the child. Jump a little, run with him, do squats, squat (like ducks) so that the child’s muscles are elastic and easier to stretch. Remember - never pull on an unheated (“cold”) child; in addition to pain, you can also damage the baby’s ligaments. Do not do anything abruptly, only with smooth movements and springing several times.
There are several ways to stretch for splits:

Properly executed twine:
- right or left split: the child sits on the split, shoulders and hips are on the same line, the back is flat, the knees and toes are tense; - transverse split: stand on the side and look, if the legs are on the same line, the knees and toes are tense, then the child is sitting Right. If there is no line (i.e. a corner instead of a line), then it is not a split, but legs apart).
If you want to achieve results in stretching, then it is advisable to do the exercises daily, then the muscles will become more elastic. And of course, the sooner you start studying, the better. Another important element for twine is the fold.
II. Fold.
A fold is when a child sits on his butt, his legs are together in front of him, and his tummy lies completely on his legs, his hands clasped his heels, his knees are stretched like “strings.” 
Exercises to help prepare for the fold:
- The child sits on his butt - his legs lie together in front of him on a small chair and we bend forward (put the tummy on the legs) trying to grab the heels.
- The child sits on his butt, legs in front of him - we do exercises with both feet together: towards ourselves - pull towards the floor (20-30 times), knees stretched. Then we fixed our feet towards ourselves and leaned towards the legs, trying to reach the feet and grab them.
- Standing position: legs together, knees extended, bend forward - you need to put your palms completely on the floor, then try to hug your legs. This exercise can also be performed in motion: we take small steps with our legs while bending forward and reach the floor with our hands (or place our palms on the floor), the tummy should rest on the walking leg.
- We stand facing the wall bars - we throw one leg onto the wall bars at the level of the hips (hips and shoulders on the same line) - and bend towards the leg (to the right and to the left).
Your baby will be better able to do these exercises if you are an example for him! Do these exercises opposite each other and point out your baby’s mistakes. Be a positive example for him! What the fold exercise does is stretch the hamstrings, which play a big role when stretching into splits.
III. Bridge.
Your little one has probably tried to stand on the bridge on his own more than once. Even when they are very small, they often bend over, making their first funny parodies of the bridge. How to make bridges correctly? The correct bridge is when the fingers are as close as possible to the heels of the feet (touching is desirable), the feet are shoulder-width apart (a little wider is possible). The bridge turns out to be beautiful and high. 
Exercises to develop flexibility and pump up the back muscles of a child:

When the child’s back is already a little prepared, it’s time to start teaching him how to make a bridge “from above”, i.e. bridge from a high position. First, it is better to lay something soft on the floor (so as not to hit your head), since the child’s arms are still weak and will creep to the sides, and of course, do this exercise at first only with mom (dad) nearby. Then you should take the correct stance: feet shoulder-width apart, hands at the top near the ears, eyes raised up and looking at the tips of the fingers. Then hold the child under the back (it’s better for you to take a position on the side of the child and he will, as it were, lie on your hand), the baby little by little (slowly) begins to tilt back. When the deflection is so good (the eyes see the floor), then you can lower your hands to the floor. You can also hold the child by the swimsuit (T-shirt, blouse) while standing in front of him. Each time, reduce the degree of your participation in the process of standing on the bridge. When you are sure that the child will not fall on his head, try to have the child make the bridge on his own. And another very useful exercise that will help your child learn to do a “bridge from above” - the child stands with his back to a wall (preferably a Swedish one) at a short distance from it, bends and begins to gradually move his arms to the very bottom of the wall and then, moving his arms and on the floor itself (if it is a wall bars, then he intercepts the sticks alternately with his right and left hands).
The back has been stretched, the legs have been stretched, it’s time to pump up the abs. There is a good exercise corner for this.
IV. Corner
Corner - sitting position on your butt, legs together, lift your legs and arms off the floor and hold the corner. Hands to the side (will help maintain balance), legs point up towards the ceiling. It is advisable to hold the corner for 5 seconds to begin with. Then, each time you repeat this exercise, increase the time it takes to perform it. Your child will have more fun doing this exercise if you keep him company.
Several exercises to strengthen your abs:

There are still very good exercise to strengthen the lateral back muscles: - you lie on your side with the baby opposite each other, one hand under your head, the other lies in front of you. The legs are extended and one of them is raised 45 degrees. We make movements - we pull one leg up to the position of the other (as if we were kicking up the raised leg), we start working lateral muscles backs. - you are in the same position, but now you raise your body, leaning on the hand that is in front of you. Second hand behind the head.
V. Birch
Birch - lying on your back, legs up at the ceiling, holding your butt with your hands (arms bent at the elbows, legs together). You’ve probably done this exercise yourself more than once; now teach your child how to make a birch tree. At first it will be very difficult for the baby to hold his butt in his hands)), but with your help (hold his legs up) he will do it much better. 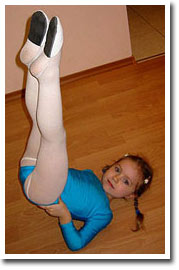
VI. Martin
Swallow - standing position, back straight, arms to the side, legs together. We raise one leg back, preferably so that the body remains vertical and the leg is raised as high as possible (horizontal to the floor and both legs extended). For a baby, this is a rather difficult exercise, since you need to learn to transfer the center of gravity of your body to one leg and be able to maintain balance. To begin with, start practicing the “heron” exercise with him: standing on one leg, the other leg bent at the knee and the toe pressed to the supporting leg, arms to the side (help to maintain balance). Alternate your supporting leg. As soon as the “heron” begins to turn out, move on to the “swallow”. In addition, a very useful exercise is to walk along one line: lay out a ribbon or jump rope and let the baby walk along it. 
VII. Somersault
Somersault is an element that young gymnasts They are taught already in the first year of training and then use it throughout their entire sports life. Standing position, one leg extended slightly forward, arms also directed forward. We take a step with our legs, touch the floor with our hands, bend our heads towards our tummy, sort of group ourselves, roll onto our backs, bend our crossed legs under ourselves and rise on the same leg with which we took the step. What mistakes can be made when performing this element: - make sure that the child does not stand on his head when performing a somersault (dangerous, it can damage the neck), - the somersault must be done in a group, then it will be neat and fast, and this is especially useful when the somersault is performed in a bunch of gymnastic exercises.
After you have worked out, it will be good to “unload” the spine. To do this, if you have a wall bars, then you can hang on the wall bars, if not, then take the child by the arms (or legs) and lift him off the floor.
 |
 |
The article was added with the permission of Yulia Sitnikova